Scenic Build
We got an amazing opportunity to demo some LED tape from German Lighting Products. In exchange for an article that talks about our design, Technologies for Worship Magazine and GLP agreed to provide all the LED tape, Power Supplies, and DMX decoders we would need to build this set.
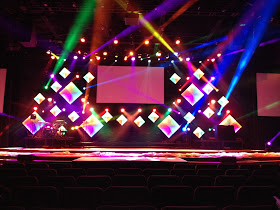
My concept for this set was to try and create a modern stained glass look. Over the design process, I simplified the set pieces some to ensure we had enough time to build them. What we ended up with is the cool multi triangle diamonds we call the Rock Boxes. The rock boxes are an internally lit light box that has dividers to help segment the fixture into multiple smaller fixtures.
We built our boxes in 2 sizes 4' x 4' and 2' x 2'. We cut 3/4" plywood into 2'x2' and 4'x4' squares as the bases for the boxes. We painted the backs black and covered the front in Aluminum foil. We used spray 77 glue to attach the foil to the plywood. Once cut and foiled, we used a plunge router and routed lines that intersected at the center of our boxes. These lines were cut to hold our coroplast dividers in place. We cut these lines on every corner and every 8 inches between corners.
We built boxes from 1"x3"s to form the outer edges of our boxes. We painted these black before cutting and assembly to cut a step out of our build process.

These outer edge boxes attached directly to the plywood with simple dry wall screws. We also pre-drilled a large hole that would allow the LED tape connectors to exit the box. While drilling, we pre-drilled for and installed 2 eye bolts to use has hang point for our boxes.
Next we installed the RGB LED pixel tape. The tape that GLP provide us was the SceneX 31.25mm pixel controlled LED tape. The individual pixel tape that they supplied was the reason this set worked out so amazingly! We did a pretty poor job of cleaning the surface as we installed the LED tape and had issues with it staying in place. Luckily our design, as you'll see later, helped us to overcome this slight challenge that we created for ourselves.
As we installed the LED tape we learned quite a few things that helped us along in the process. The quickest lesson we learned was how poor our entire team is at soldering. This was not a huge surprise, but of the dozen connections I soldered, only one of them worked correctly. As we wired the LED tape into the first box, we realized how much time (time we didn't have) it was going to take to solder all the tape in the way we had planned. After the first box we decided to make some minor tweaks and cut the number of boxes. We did this in order to cut down the number of solders we would have to make by using the pre-existing connectors, and wasting a bit more tape than we had planned. We can use the scraps in the future because of how the tape is designed. I just need to get a lot better at soldering. With our revised plot we were able to cut out all but 24 solder joints. Our large boxes ended up taking 3 full strands of LED tape and a partial strand, while the smaller ones took 1 full strand and a partial.
We went ahead and wired all of our power supplies and decoders as we put the tape in. Although when we first started the project LED tape wiring was a bit unfamiliar to us by the time we finished this set we had a good grasp on it. Our wiring was as follows: We brought 208V into our power supplies on the back of each Rock Box. This power supply then stepped the voltage down to 5v that feed power to both our LED tape and DMX decoder. We then feed DMX into our decoder which sent it out as a signal the LEDs could understand over the clock and Data wires to our LED pixel tape. Since I'm a visual learner, I included a diagram of how we wired it.
This is the box level. Later we will go over how the whole system was wired together.
In our next step we cut 2.75" strips of coroplast, that later would be cut into dividers for our Rock Boxes. Once we had a nice stock pile of the dividers we began to cut them to size for each box.
We covered all of these dividers in foil tape as well. Although covering everything in foil tape took FOREVER! It was well worth it for the finished project. We built a prototype for this set before we started construction, and, as you can see below, the sections that had foil tape were twice as bright.
After buying out every store within 10 miles of the church of foil tape and laboring tirelessly we finished the dividers. Sadly, I have few pictures of the foil taping that consumed large portions of our month of March.
As you can see we foil taped each divider then place it within its groove. We didn't have pixel tape in most of the boxes yet. We ran into a shipping issue getting our LED tape and actually ended up cutting and installing most of our dividers before we installed the LED tape. Once we received the tape we took each of our dividers out in order, installed the tape, then re-installed all the dividers. It was a party to say the least!
At this point, the boxes were built and divided and all the LEDs and wiring components were in place.
As you can see it looks like the worlds most interesting waste of Aluminum.
Before we went any further, we tested the boxes. Once all of them were tested we cut natural (clear) coroplast to the size of the boxes. Once cut, we taped all the coroplast on as a facing using 3" wide black gaff. We made sure to only cover the width of the 1"x 3"s on the coroplast to maintain our nice square look.
At this point we tested them all via dmx before we hung them.
As promised, below is the diagram of the LED system wiring
We used Madrix to control our rock boxes. Our Madrix computer connected via USB to a Madrix Luna 16, which output our needed 16 universes of control for the boxes. We could fit 1 large box or 2 small boxes per universe of DMX. Our Grand MA acted as a remote for the Madrix via a dmx signal to the Luna 16 dmx input.
Lighting Setup
This year our Easter series was "Wallpaper - Change your pattern, Change your life" Building off of that we wanted to create an atmosphere that was a significant change from our normal. We took this on from a few different angles. First with our lighting design, we built a layout that relied a lot on contrast. We used Elation Platinum Beam 5rs that are a stark departure from our mostly soft edged fixtures. We built the rock boxes discussed above which was also a stark departure from our previous set which was all lighting in a black void. Lastly, our senior leadership asked us to implement a kabuki system that we could project on for an opener. There is no easier way to change the pattern of the room than by putting a 110' drape across it! Well, there may be, but not as effective for sure!
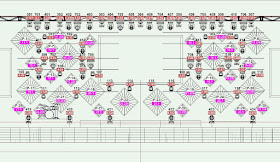
One of the first things I did with this set was layout the lighting fixtures. I want to ensure that regardless of where the set components went I would have a good base of lighting to create with onstage. I designed in 2 layers of back light and 2 layers of texture to cover the downstage and upstage portions of the stage. Then on top of that was layered 101s that I used as a second back light option and also aerials. Lastly, I added the Elation Platinum beams for my stark contrast of aerials.
Once our plot was set in stone, we fit in our set pieces around it.
As you can see above our original plan changed a bit during the build, but most of the pieces stayed in a similar place. We had to cut a few panels out of the design to keep on schedule, as I mentioned earlier.
One of our biggest visual elements of Easter was the 110' projection we did across the front of our stage. It was also one of the most challenging items during the setup.
We typically have between 15 and 20 minutes between services, so to accommodate a quick re-set, we hung everything on chain motors. As you may be able to tell in the pictures, we had to invert our chain motors in order to get the right amount of height for our drop and to hide the motors / chain bags. If you ever get the chance to hang a 1 ton motor inverted, let the opportunity pass. I can assure you there are much more fun things in life.
We ordered our Kabuki curtain sewn with Velcro in the hem. This Velcro then had sewn eyelets that attached to it. In the case of a failure we had the ability to pull the entire curtain down manually. Sadly, during an experience we had to manually pull the Kabuki down due to a faulty circuit. Luckily our awesome team handled it like pros and had the curtain down and away pronto.
As you can see above, the kabuki looked pretty sweet as it dropped. You can also see that we used DL-3s to project onto the Kabuki. We used the DL-3s to map across the entire curtain and a bit onto the side walls. After the kabuki drop, we re-purposed the DL-3s to environmental projection on the walls. We also used a few of the DL-3s utilizing a mask we built to project texture onto the rock boxes. At one point during the services, we even used the internal camera on 2 of the DL-3s to feed live video to the side wall DL-3s.
Our most memorable visual element of the lighting is certainly the rock boxes though. They have a ton of flexibility and will be our existing set for the next few months. After that I'm certain we will re-purpose them for another use.
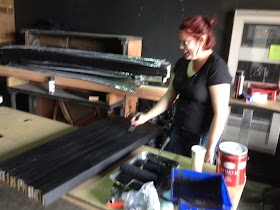
Below you can see a ton of pictures of the awesome people that made this set happen and the specifics of how they did it! I am so thankful for our great team.
If you have questions, as always, feel free to e-mail me at stevenhallav@gmail.com

Lexy's thought on the rock boxes.... :)
Yes, these are the empty's.... It would be a sad day for the DL-3s and whoever lifted them if not!
... Rest is a necessity.
Our fabulous production team!

The trek back to Gemini Stage Lighting to return rentals with my outstanding family.


No comments:
Post a Comment