Monday, December 26, 2016

Easter 2016


For Easter this year, we took a pretty big departure from our few previous sets.  We had a lot more visual surfaces than our norm.  The four sets before this each had a scattering of lights and LED tape in order to create a void we filled with beams and points of light.  For Easter we changed this drastically.  Although we did not completely forgo the beamy looks, we much more heavily relied on lighting our scenic element, Mod Scenes.


One of the challenges we had to overcome with this set, was a huge change in production staffing.  Our lead audio director left shortly after Christmas and our lead video director left about two months later.  We had some key volunteers step into those positions on a temporary basis and they did amazingly, but as you can imagine there was a lot of trying to figure out the details still.  We also had one of our annual large gatherings, Good Friday in the Park that also took place that week.  To say it was busy would be an understatement.


  So one of our key wins for this set was to have something simple that would set quickly and look great!  


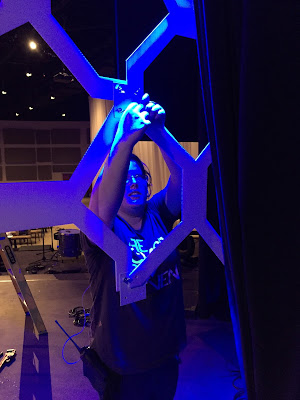
For the set we hung Agon Panels from Mod Scenes to create our backdrop.  When rotated they create a really cool geometric breakup as you can see in the photo above.  They also build really quickly, which was helpful.  Our Scenic consisted of 300 panels and was built in less than 2 hours. We had a large central backdrop that was flanked on each side by smaller backdrops under each side screen.  We filled the space under each screen to make the stage look bigger.  This became a huge need as during the planning we added both the choir and a baby grand piano to the stage for Easter.


We down lit and up lit the Mod Scenes with Colorblasts.

To cut down on setup time, we used motors and truss to lift our center section of Mod Scenes.  On the sides we use VER locks (one of the greatest rigging inventions ever!) to hang a pipe holding the shorter sections of Agon panels.


Behind the Mod Scenes backdrop we laid out our LED tape.  We created a breakup type pattern by hanging the tape on random angles.  We hung 20' sections of unistrut that had Led tape zip tied to them.  Each unistrut hung from a pipe about 16' up.  We set all the angles by eye and criss-crossed the unistrut at the bottom to fit them into the space.  In Madrix each pixel had to be set individually to create the correct angle.  It was less than awesome on that part, but it looked dang good!


In front of the Mod Scenes we hung a few 25' long pipes that held Mac 101s.  We used these for our beam looks.  We nearly hung them behind the Mod Scenes, but decided to move a bit downstage.  It was a good move and helped us to pull the focus of the scenic in a few intimate moments.  We built a lot of our groupings and pan/tilt positions for the 101s in sets of three.  It created some really interesting looks, which show very well in the video at the end.

One of our biggest creative elements was a song and spoken word called "Glory".  It started as a solo, added in a spoken word and by the end grew into a full band feature with the enitre Choir.  It was quite epic!  Check it out:

Video of "Glory-Creative Element" from Easter 2016

Video of Setup Timelapse
As always more pictures are below!


Previous set:


RIP Previous Set


Yah!  New set!


Wednesday, May 11, 2016

MCKBD 2015


My Church is Kinda a Big Deal is kinda a big deal!

Every year we create an amazing atmosphere for our back to school celebration!  This year I think we hit it out of the park!

We created a lobby atmosphere based off of Games.  We made over sized, game boxes, interactive games, and a huge Jenga structure!


As you can see it was quite awesome!  We had the game boxes screen printed on coroplast (and built onto 2"x 4" boxes),  We painted monopoly pieces on our entry sidewalks with utility marking paint.  This took a full day of pressure washing to get it off (most of it at least).  We also built wooden monopoly houses and hotels!  We had a Jenga stencil CNC cut and created our own giant Jenga out of 36" x 12" x 12" boxes.  This was a blast to setup.  Sadly, I lost the 1st game.....  In my defense it is a bit harder to place the pieces from a lift 20' in the air.

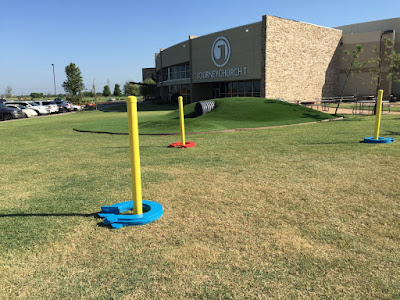
Outside we also created an over sized horse shoe pit.  We used 3/4" foam (glued together and painted) to create the horse shoes and PVC for the stakes.  We cut the foam with a jig saw.  The scrap foam ended up making sweet Halo swords!


In the auditorium, though is where we really stepped it up most!  We created a low res LED wall with one of the best lighting layouts I've designed in my life.  I smile just thinking about the sweet stuff we could create with it (Yes, I am that much of a lighting geek!).


As you can imagine, this set was huge under taking and would not have been possible without everyone in our great team!

We only purchased a small amount of gear for this set, most of which was for support structure.  We recycled a lot of our material for this set from our Rock Box set.  About half of our LED tape was from the Rock Box set.

We used GLP Scenex 30m led tape driven by GLP PP4 drivers and a computer running Madrix Professional for content.

We built a 45' wide truss along our upstage edge.  All of our Unistrut (+ LED tape and movers) hung from this truss in a giant grid.  We used some Mega claws to allow us to swing down the unistrut as we flew the truss out.


We built our grid in two 10' sections.  As you can see in the above pictures we zip-tied on our LED tape to the unistrut.  There are also more detailed pictures below.

Once we had tweaked all of our spacing we added a horizontal piece of uni strut across the bottom of the 10' section to ensure our spacing stayed symmetrical.  We used 18" spacing to hang our unistruts.  We built our light weight led fixtures into our unistrut grid too.  As you can see, we used 90 deg brackets to hang our mac 101s, which made programming much easier too.


Once the top layer was wired and hung, we flew up the grid and added another 20' of unistrut to finish the "wall".  As you can see below, there is a 16' x 10' gap for our center screen to hang in.


As you can see here the LED wall is incredibly flexible and you can create a ton of visuals with it.  But, you can still also have great lighting positions.  My favorite part of this set is its flexibility.  I could easily create bright energetic looks early in the worship set and transition into a much more intimate setting without and physical changes.


As you can notice in most of the pictures, there is no center screen.  For a portion of our following series we used a lifting screen.  Sadly there was a whole in the wall, but it still looked great.

As you can probably tell this design focused mostly on back light (I know, i know all of my designs do).  We even used our Colorblast 12s for back lights too.  Their rectangular shape and tight beam gave us another interesting layer.

For years I have wanted to create a set like this that is a huge visual landscape, but allows lighting to be placed freely too.  This set was awesome!  The best part is all of this material we can re-use for future sets.

I hope you enjoyed this as much as we did building it.  If you have any questions shoot them to me at stevenhallav@gmail.com