My Church is Kinda a Big Deal is kinda a big deal!
Every year we create an amazing atmosphere for our back to school celebration! This year I think we hit it out of the park!
We created a lobby atmosphere based off of Games. We made over sized, game boxes, interactive games, and a huge Jenga structure!
As you can see it was quite awesome! We had the game boxes screen printed on coroplast (and built onto 2"x 4" boxes), We painted monopoly pieces on our entry sidewalks with utility marking paint. This took a full day of pressure washing to get it off (most of it at least). We also built wooden monopoly houses and hotels! We had a Jenga stencil CNC cut and created our own giant Jenga out of 36" x 12" x 12" boxes. This was a blast to setup. Sadly, I lost the 1st game..... In my defense it is a bit harder to place the pieces from a lift 20' in the air.
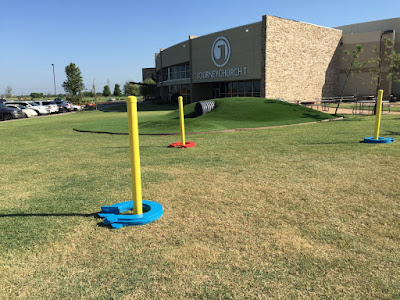
Outside we also created an over sized horse shoe pit. We used 3/4" foam (glued together and painted) to create the horse shoes and PVC for the stakes. We cut the foam with a jig saw. The scrap foam ended up making sweet Halo swords!
In the auditorium, though is where we really stepped it up most! We created a low res LED wall with one of the best lighting layouts I've designed in my life. I smile just thinking about the sweet stuff we could create with it (Yes, I am that much of a lighting geek!).
As you can imagine, this set was huge under taking and would not have been possible without everyone in our great team!
We only purchased a small amount of gear for this set, most of which was for support structure. We recycled a lot of our material for this set from our Rock Box set. About half of our LED tape was from the Rock Box set.
We used GLP Scenex 30m led tape driven by GLP PP4 drivers and a computer running Madrix Professional for content.
We built a 45' wide truss along our upstage edge. All of our Unistrut (+ LED tape and movers) hung from this truss in a giant grid. We used some Mega claws to allow us to swing down the unistrut as we flew the truss out.
We built our grid in two 10' sections. As you can see in the above pictures we zip-tied on our LED tape to the unistrut. There are also more detailed pictures below.
Once we had tweaked all of our spacing we added a horizontal piece of uni strut across the bottom of the 10' section to ensure our spacing stayed symmetrical. We used 18" spacing to hang our unistruts. We built our light weight led fixtures into our unistrut grid too. As you can see, we used 90 deg brackets to hang our mac 101s, which made programming much easier too.
Once we had tweaked all of our spacing we added a horizontal piece of uni strut across the bottom of the 10' section to ensure our spacing stayed symmetrical. We used 18" spacing to hang our unistruts. We built our light weight led fixtures into our unistrut grid too. As you can see, we used 90 deg brackets to hang our mac 101s, which made programming much easier too.
Once the top layer was wired and hung, we flew up the grid and added another 20' of unistrut to finish the "wall". As you can see below, there is a 16' x 10' gap for our center screen to hang in.

As you can see here the LED wall is incredibly flexible and you can create a ton of visuals with it. But, you can still also have great lighting positions. My favorite part of this set is its flexibility. I could easily create bright energetic looks early in the worship set and transition into a much more intimate setting without and physical changes.
As you can notice in most of the pictures, there is no center screen. For a portion of our following series we used a lifting screen. Sadly there was a whole in the wall, but it still looked great.
As you can probably tell this design focused mostly on back light (I know, i know all of my designs do). We even used our Colorblast 12s for back lights too. Their rectangular shape and tight beam gave us another interesting layer.
For years I have wanted to create a set like this that is a huge visual landscape, but allows lighting to be placed freely too. This set was awesome! The best part is all of this material we can re-use for future sets.
I hope you enjoyed this as much as we did building it. If you have any questions shoot them to me at stevenhallav@gmail.com


